
Campaigns
Campaigns are the core of Phishing Club. This is where you setup, monitor and manage phishing campaigns.
Overview
The campaigns page displays all phishing simulation campaigns and provides access to campaign data, recipient information, and management functions from a single interface.
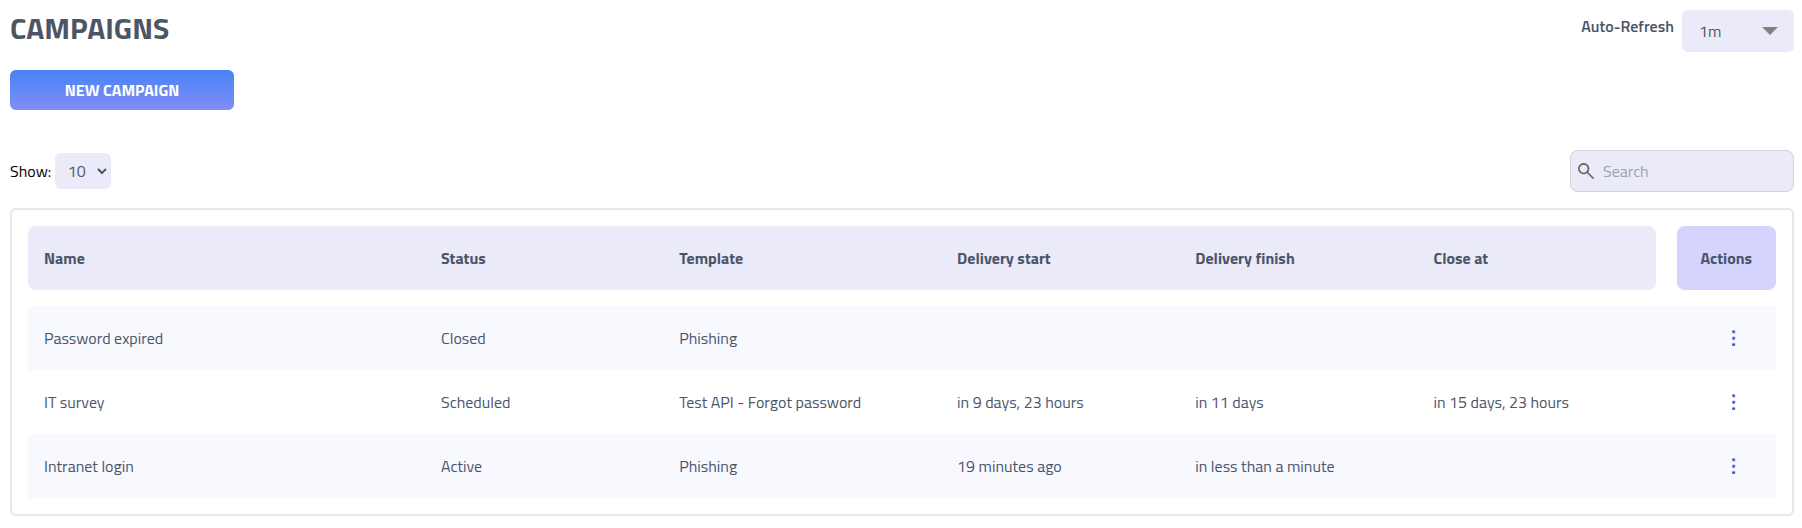
Click on any campaign name to access detailed data, recipient interactions, and management options for that specific campaign.
Create new campaign
Prerequisites
Before creating a campaign, ensure you have the following components configured:
- A template with all required elements
- At least one group with recipients
- Configured domains and email delivery settings
Step 1: Basic Campaign Information
Begin by clicking
New Campaignon the campaigns page and configure the campaign settings.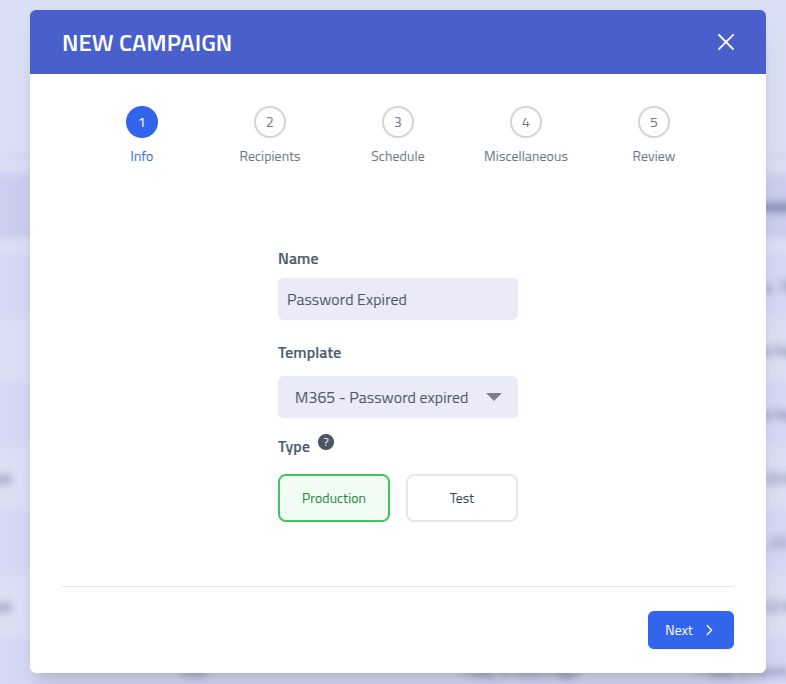
Campaign Creation Step 1: Basic Information and Configuration Campaign Basic Information Configuration Description Campaign Name Descriptive name to identify this simulation campaign Template Template containing email design, landing pages, and delivery settings Campaign Type Testcampaigns are excluded from aggregated data and marked with a test label for testing purposesStep 2: Target Recipient Selection
Select the recipient groups that will be targeted in this campaign. Choose from your pre-configured groups to define your simulation audience.

Campaign Creation Step 2: Recipient Group Selection Note: The number beside each group represents the total recipients in that group. Each recipient is included only once, even if they belong to multiple selected groups.
Step 3: Delivery Method Configuration
Configure how and when your campaign emails will be delivered by selecting a delivery method that matches your simulation objectives.

Campaign Creation Step 3: Delivery Method Selection Time Box Delivery
The
Time Boxmethod evenly distributes email sending across your specified time window, ensuring consistent delivery patterns.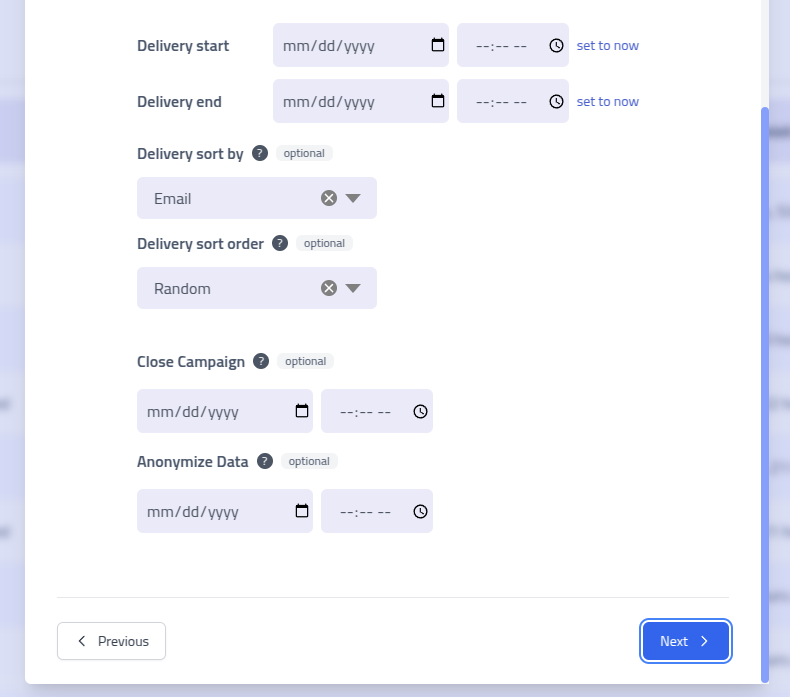
Time Box Delivery Configuration Time Box Delivery Options Setting Description Delivery Start Campaign launch date and time Delivery End Campaign completion date and time Sort By Organize delivery order by recipient attributes (e.g., department, location) Sort Order Ascending or descending order for the selected sort criteria Auto-Close Automatically complete campaign at specified time. Completed campaigns stop recording new interactions. Auto-Anonymize Automatically anonymize all recipient data while preserving aggregate statistics for compliance purposes Daily Slots Delivery
Use
Daily Slotsfor precise control over delivery timing, restricting emails to specific weekdays and hours.Example: Monday through Friday, 8:00 AM to 4:00 PM
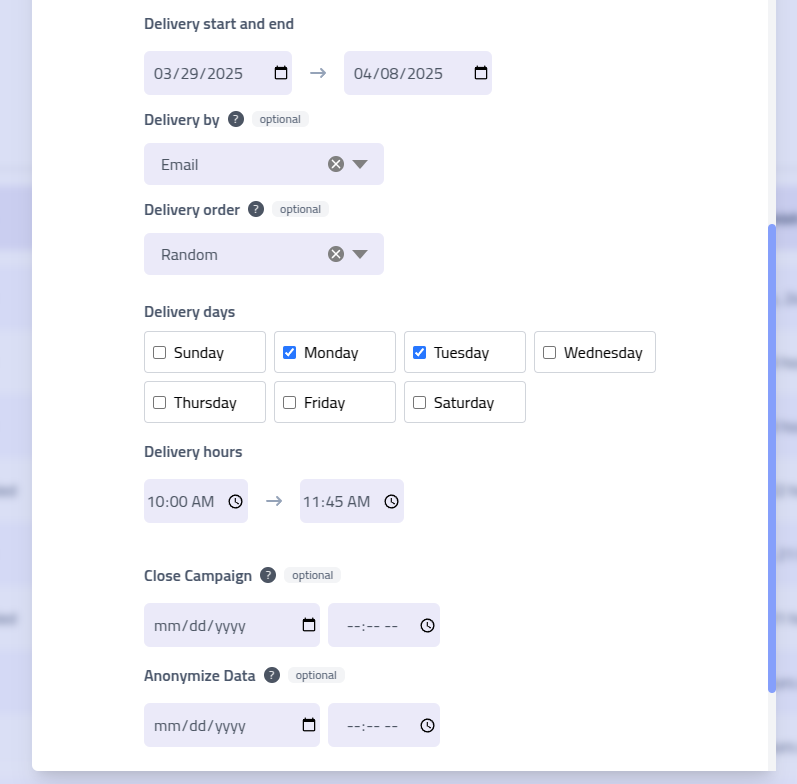
Daily Slots Delivery Configuration Daily Slots Configuration Setting Description Campaign Duration Overall start and end dates for the campaign period Delivery Sorting Recipient organization criteria and sort order Active Days Specific weekdays when emails should be delivered Delivery Hours Time window within each active day for email sending Auto-Close Automatic campaign completion settings Auto-Anonymize Scheduled data anonymization for privacy compliance Self-Managed Delivery
Self-Managedcampaigns provide flexibility by allowing manual control over email delivery. This method is ideal for custom delivery scenarios, multi-channel approaches, or integration with external systems. Delivery when and how you want.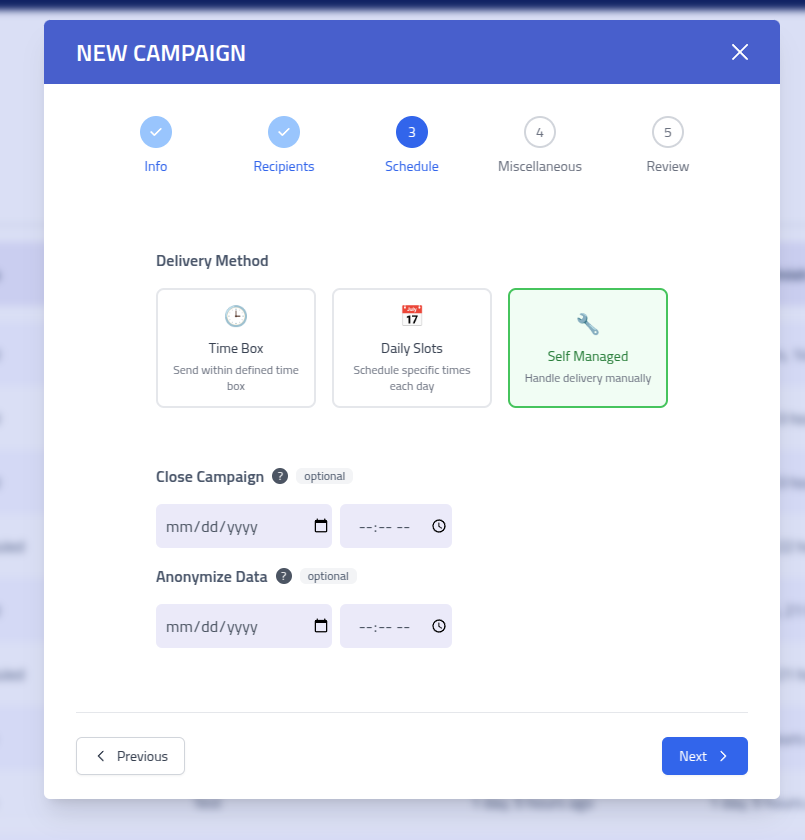
Self-Managed Campaign Configuration Self-Managed Campaign Options Setting Description Manual Close Configure when to manually complete the campaign and stop recording interactions Manual Anonymization Settings for manually triggered data anonymization while maintaining statistical integrity Step 4: Miscellaneous
Configure if the campaign should save submitted data, assign webhooks and setup security for the campaign.
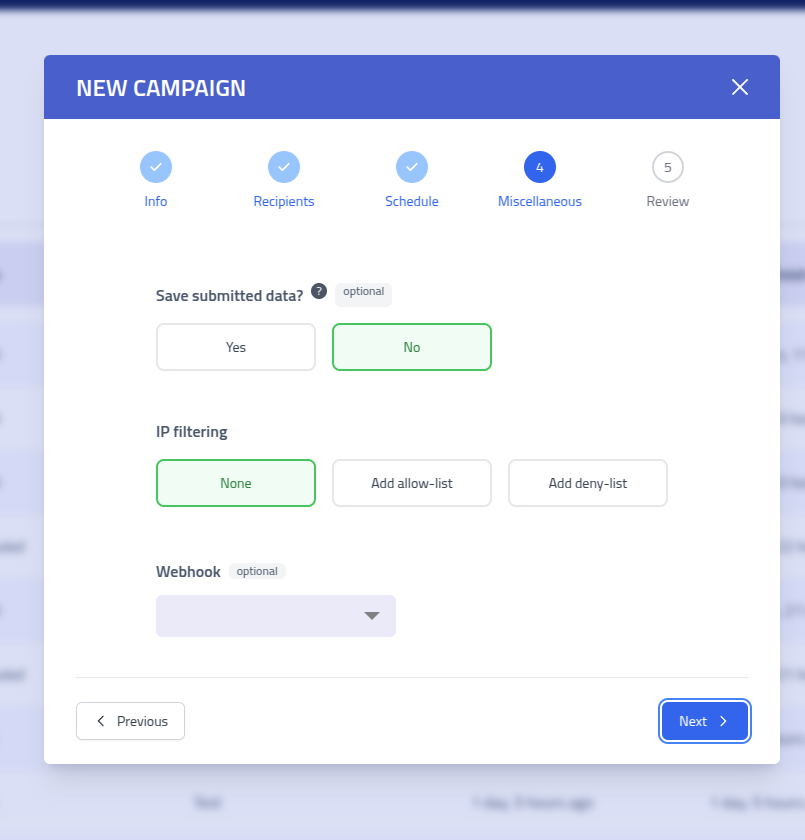
Campaign Configuration Options Advanced Campaign Features Field Description Save Submitted Data Enable collection and storage of data submitted by recipients on phishing pages Webhook Enable a webhook on the campaign Security configuration Configure Anti-Bot / Evasion and IP allow or deny listing for the campaign. Webhook
After selecting a webhook, you can select the
Data Leveland which events should be sent with the webhook.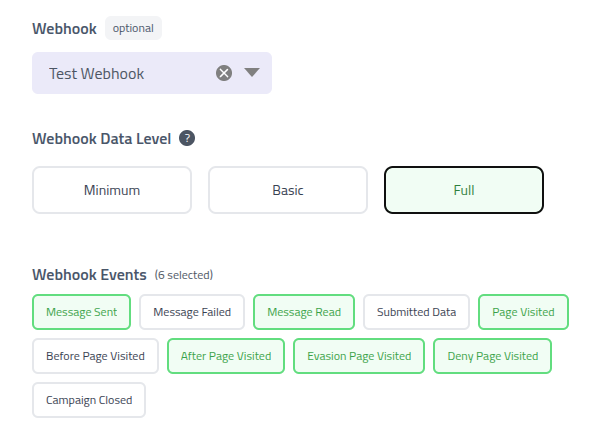
Webhook configuration Webhook Data Level Field Description Minimum Send only event type and timestamp - no campaign info, emails, or data Basic Send campaign name and event, but exclude recipient email and submitted data Full Send all data related to the event. Security configuration
Configure if the campaign should save submitted data, assign webhooks and setup security for the campaign.
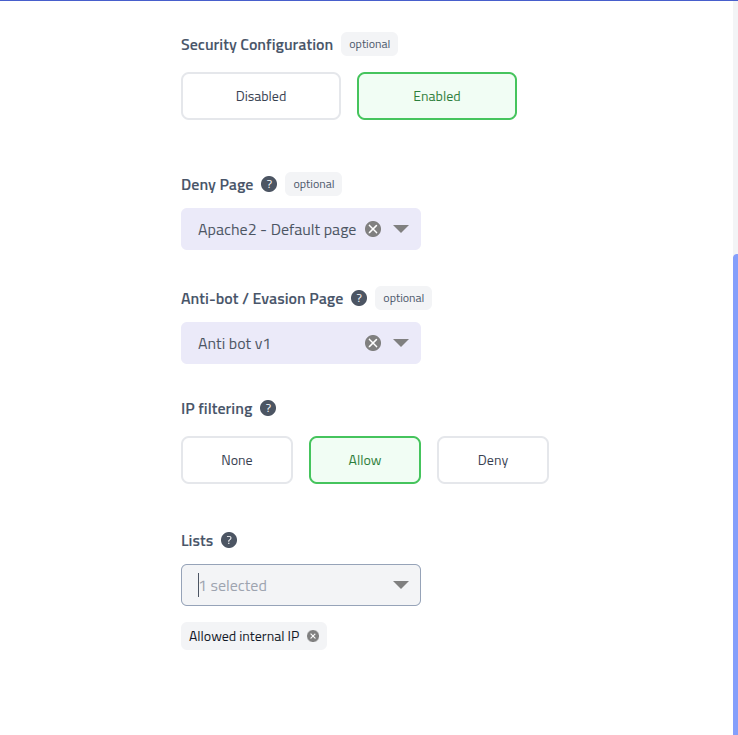
Campaign security configuration Security configuration Field Description Deny Page The page to show when the visitor is denied access Anti-bot / Evasion Page The page to use as evasion page. Uses the {{.URL}}for loading the page and{{.DenyURL}}for the deny page.IP filtering Which IP filtering mode to use. Lists IP filter lists to use Step 5: Campaign Review
Review all campaign configurations before launching your phishing simulation. This final step prevents configuration errors and ensures proper campaign operation.
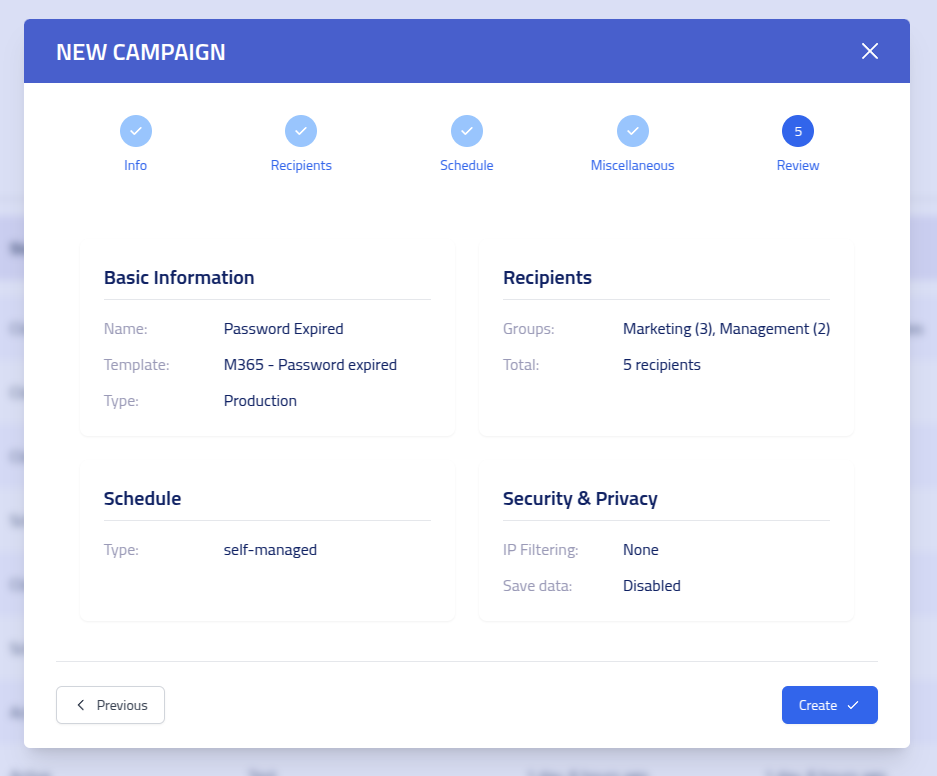
Final Campaign Review and Launch Interface Verify all settings, recipient selections, and delivery configurations. When satisfied with your campaign setup, click
Create Campaignto launch your phishing simulation.
Score cards
The score cards at the top of each campaign page provide quick data summaries. Clicking a score card switches the percentage between absolute and relative.

| Field | Description |
|---|---|
| Recipients | Total number of recipients targeted by this campaign |
| Emails Sent | Number of emails successfully delivered to date |
| Emails Read | Unique recipients who opened the email (read confirmation received) |
| Website Visits | Unique recipients who clicked through to phishing pages |
| Reported | Unique recipients that have reported the campaign |
Timeline
The campaign timeline provides a visualization of all campaign events.

Timeline Navigation
- Zoom In: Double-click or scroll to focus on specific time periods
- Event Details: Hover over any event marker to view detailed information
- Time Format: Toggle between
12hand24htime formats - Reset View: Click
Reset Viewto see the complete timeline
Campaign details
The campaign details section provides information about your simulation configuration, template settings, and available management actions.
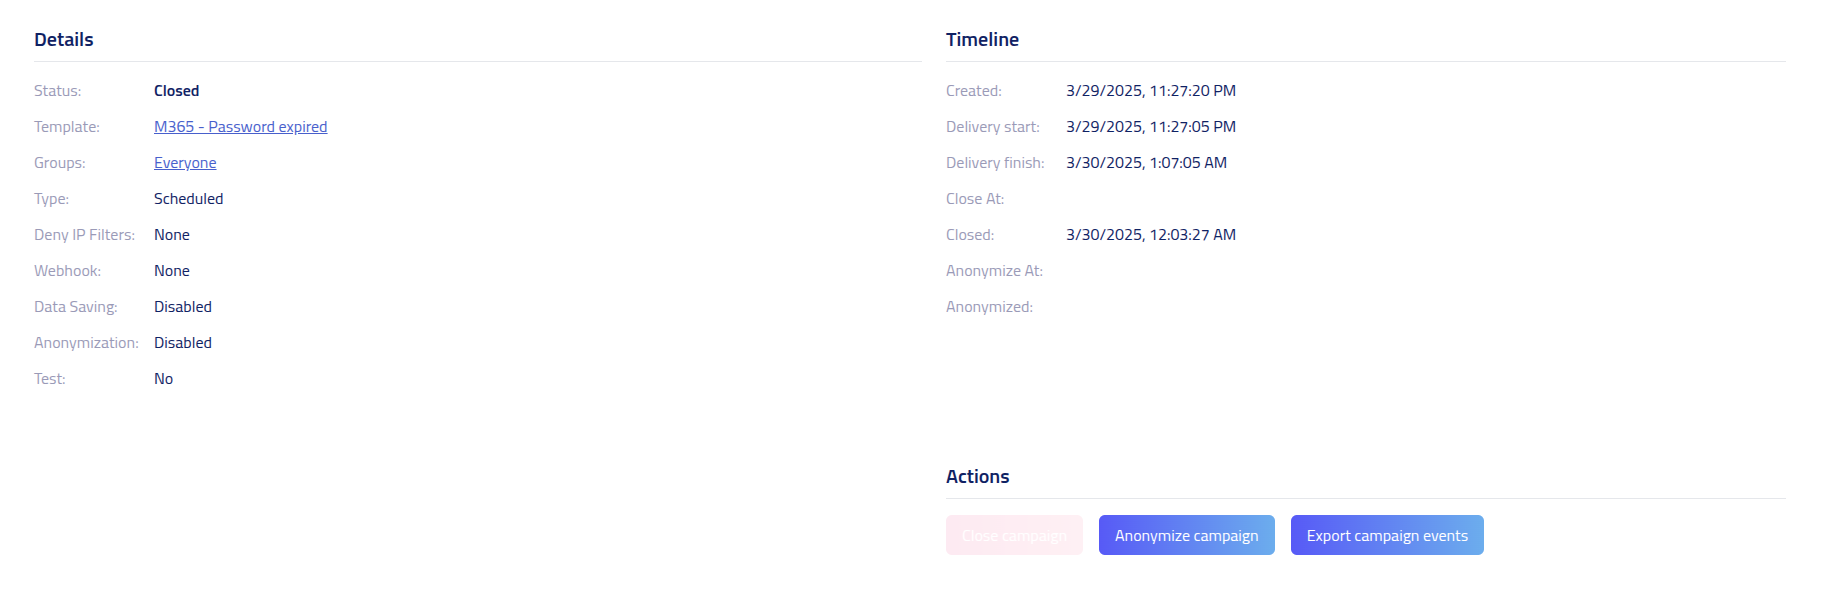
Click on the Template link to access information about the template configuration
used in this campaign.

Campaign Actions
Manually handle campaign actions such as closing, anonymizing, uploading reports or exporting data.

| Action | Description |
|---|---|
| Close Campaign | Immediately completes the campaign and cancels any pending email deliveries. No further interactions will be recorded. |
| Anonymize Campaign | Closes the campaign and anonymizes all collected data. Individual recipient data gets anonymized. |
| Events | Downloads a CSV file containing all campaign events, interactions, and timestamps for data export and reporting. |
| Submitters | Downloads a CSV file containing all submitters of the campaign. |
| Report | Generates and downloads a PDF report for the campaign. See Report for details. |
| Upload Reported CSV | Upload a CSV with the users that reported the campaign. The CSV file must contain the following headers: This format as can be exported from Microsoft 365. More information can be found on Microsoft Submissions Admin |
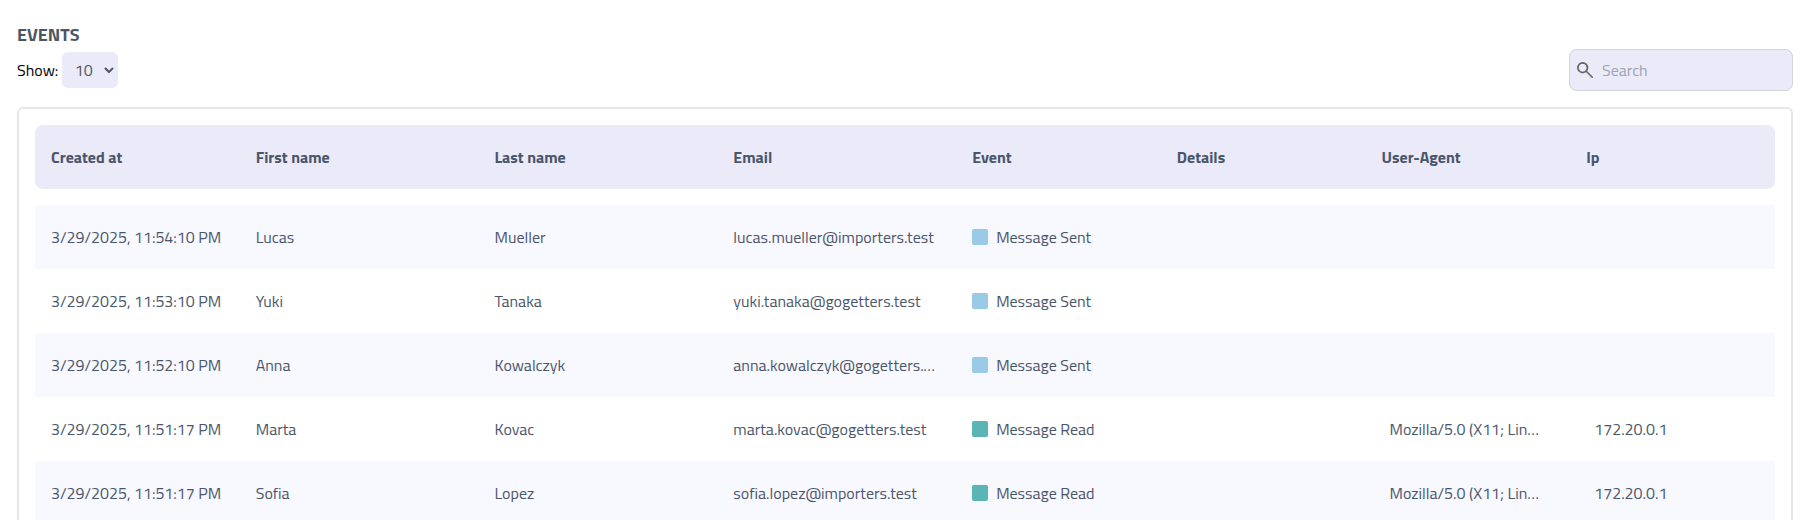
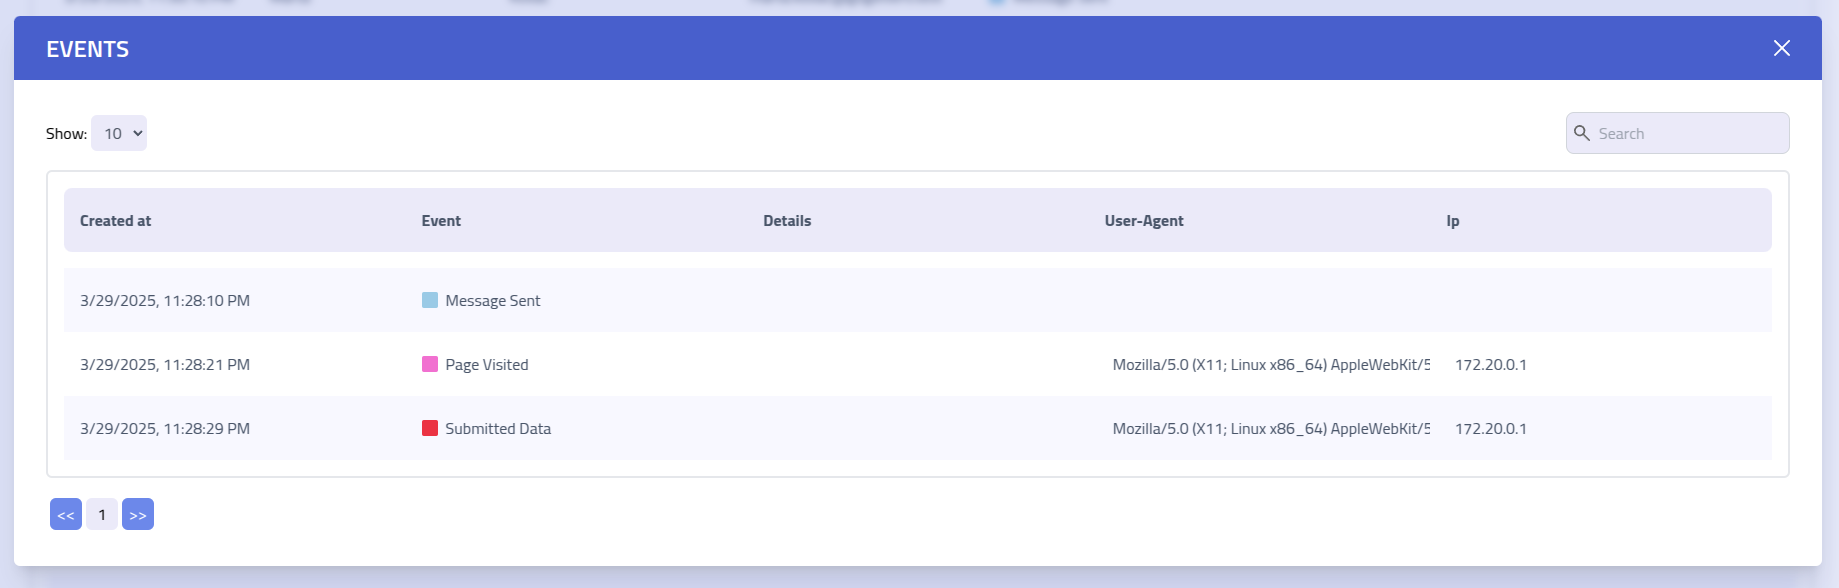
Events Data
The events table provides a chronological view of all campaign interactions.
Recipient data
The campaign recipients table displays data for each targeted user, showing their interaction level and current status within the simulation.
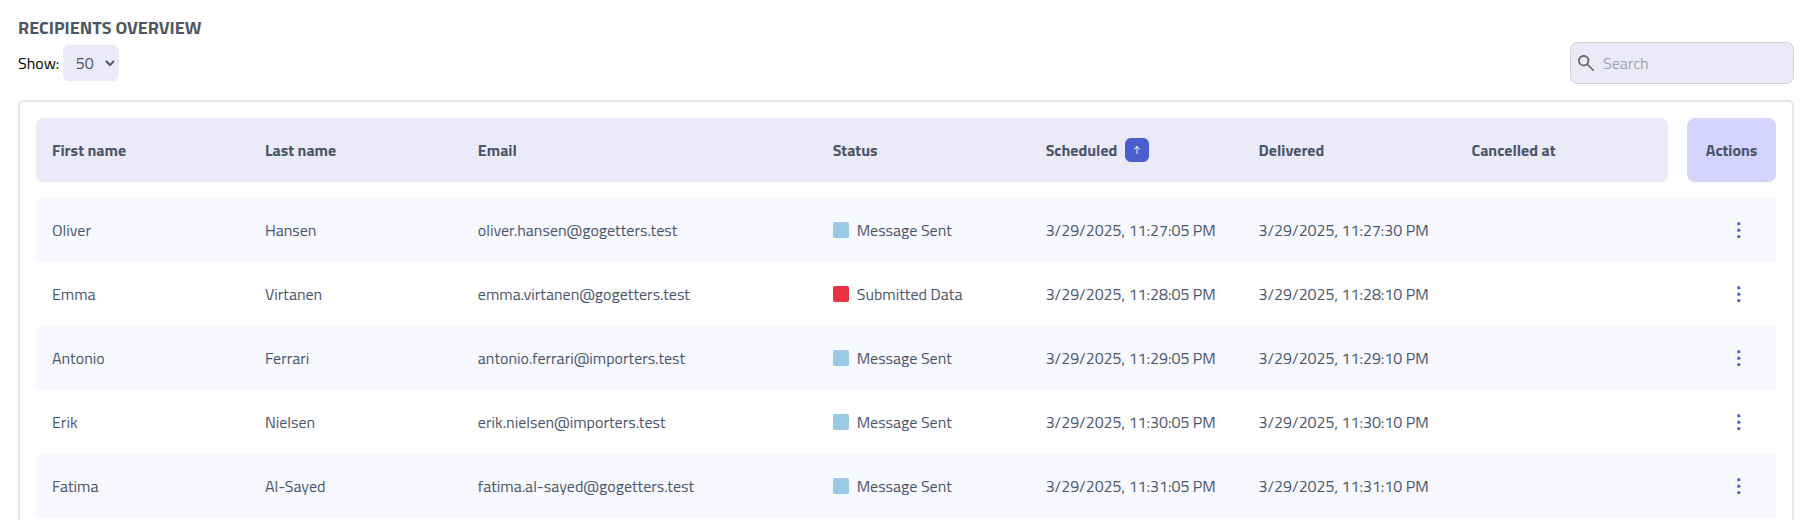
The Status column displays the highest-priority interaction event for each recipient,
showing their current engagement level.
Utilize the recipient Actions menu to manually manage email delivery, access detailed
event histories, or perform individual recipient management tasks.
| Action | Description |
|---|---|
| Copy Email | Copies the personalized email content as HTML source code, enabling custom delivery through alternative channels |
| View Email | Displays the formatted email content in a preview window. Note that viewing will trigger tracking pixels, which records a read event for this recipient |
| Copy Lure URL | Copies the personalized phishing page URL to clipboard for manual distribution or testing purposes |
| View Events | Opens the detailed event timeline for this specific recipient, showing all interactions and timestamps |
Click on any recipient name to access their individual timeline view, showing interaction history and event details:
Report
Phishing Club generates a PDF report for each campaign. Click Report in the export
section of a campaign to download it.
The report is built from an HTML template and rendered to PDF. It includes a cover page with campaign metadata, outcome charts, funnel conversion rates, and a per-recipient results table for non-anonymous campaigns.
| Field | Description |
|---|---|
| Campaign Name | Name of the campaign |
| Company | Company the campaign belongs to, if any |
| Report Date | Date the report was generated |
| Start / End / Closed | Campaign schedule dates |
| Recipients | Total number of targeted recipients |
| Emails Sent | Number of emails delivered |
| Emails Read | Recipients who opened the email |
| Website Visits | Recipients who clicked through to the phishing page |
| Data Submitted | Recipients who submitted data on the phishing page |
| Reported | Recipients who reported the phishing email |
| Conversion rates | Step-to-step funnel percentages: opened of sent, visited of opened, submitted of visited |
| Recipient table | Per-recipient results showing visit, submission, and reported status. Omitted for anonymous and anonymized campaigns. |
Report template
The report is rendered from an HTML template. A default template is included and can be edited in Settings. Each company can also have its own template, configured from the company actions menu.
The template uses Go template syntax. The following variables are available:
| Variable | Description |
|---|---|
{{.CampaignName}} | Campaign name |
{{.CompanyName}} | Company name |
{{.ReportDate}} | Date the report was generated |
{{.CampaignStartDate}} | Campaign start date |
{{.CampaignEndDate}} | Campaign end date |
{{.CampaignClosedAt}} | Date the campaign was closed |
{{.TotalTargets}} | Total recipient count |
{{.EmailsSent}} | Emails sent count |
{{.EmailsOpened}} | Emails opened count |
{{.ResultClicked}} | Website visit count |
{{.ResultClickedPercent}} | Website visits as percentage of recipients |
{{.ResultSubmitted}} | Data submitted count |
{{.ResultSubmittedPercent}} | Submissions as percentage of recipients |
{{.ResultReported}} | Reported count |
{{.ResultReportedPercent}} | Reported as percentage of recipients |
{{.SentRate}} | Sent rate as float (0-100) |
{{.OpenRate}} | Open rate as float (0-100) |
{{.ClickRate}} | Click rate as float (0-100) |
{{.SubmitRate}} | Submit rate as float (0-100) |
{{.ReportRate}} | Report rate as float (0-100) |
{{.OpenedOfSent}} | Percentage of recipients who opened of those who received |
{{.ClickedOfOpened}} | Percentage who visited of those who opened |
{{.SubmittedOfClicked}} | Percentage who submitted of those who visited |
{{.Recipients}} | Slice of per-recipient results (empty for anonymous campaigns) |
Each entry in {{.Recipients}} has the following fields:
| Field | Description |
|---|---|
{{.FirstName}} | Recipient first name |
{{.LastName}} | Recipient last name |
{{.Email}} | Recipient email address |
{{.Department}} | Recipient department |
{{.Position}} | Recipient position |
{{.ClickedLink}} | True if the recipient visited the phishing page |
{{.SubmittedData}} | True if the recipient submitted data |
{{.Reported}} | True if the recipient reported the email |
Microsoft Allow Listing
When performing whitebox phishing you should allow list the campaign. To ensure delivery of your phishing simulation campaigns, you can configure allow listing through Microsoft's Advanced Delivery Policy for third-party phishing simulations.
For templates using SMTP configuration, Phishing Club provides access to the required allow
listing information. Navigate to the campaign templates page and click Allow listing
in the template actions menu to access configuration details.
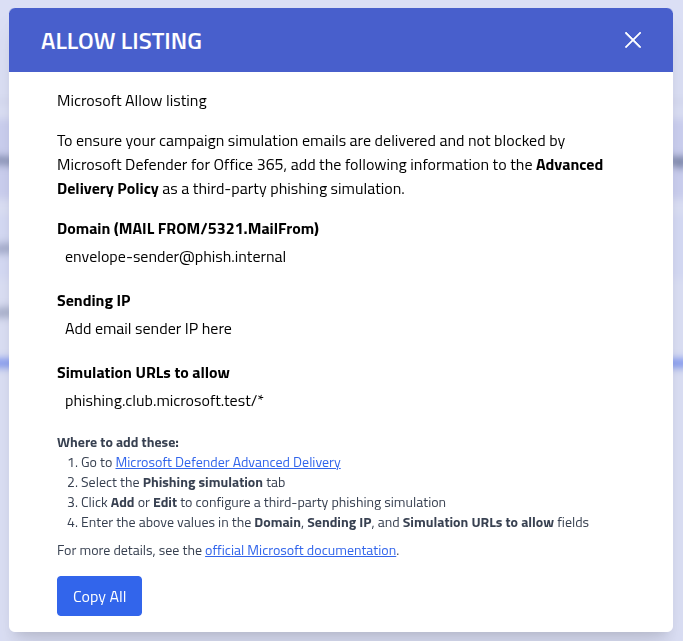
The allow listing modal displays information required for configuring Microsoft Defender for Office 365 Advanced Delivery Policy.
| Configuration Field | Description and Usage |
|---|---|
| MAIL FROM Domain | The domain component of the sender address configured in your template's email settings (RFC 5321.MailFrom) |
| Sending IP Address | The source IP address for your phishing simulation emails, typically provided by your email infrastructure or SMTP service provider |
| Simulation URL Pattern | Domain pattern for phishing simulation URLs, usually formatted as
yourdomain.com/* to allow all paths and subpages |
Microsoft Defender Configuration Steps
Follow these steps to configure allow listing in Microsoft Defender for Office 365:
- Access Advanced Delivery: Navigate to Microsoft Defender Advanced Delivery
- Select Tab: Click the Phishing simulation tab
- Create Configuration: Click Add or Edit to configure third-party phishing simulation settings
- Enter Values: Input the information from Phishing Club's allow listing
modal:
- Domain: Your MAIL FROM domain
- Sending IP: Your email sending IP address
- URLs to Allow: Your simulation domain pattern
- Save Configuration: Apply the settings to enable allow listing
For configuration guidance, consult the official Microsoft documentation on Advanced Delivery Policy configuration.