
Recipients
Recipients are the target users for your phishing. Recipient must be placed in groups to be targets of a campaign.
Overview
The recipients page displays recpients along with their information and analytics. Recipients
flagged as
Repeat Offenders are marked.

Click on a recipient name to see more details about them.
Create new recipient
Recipients can manually be typed via. the create recipient modal.
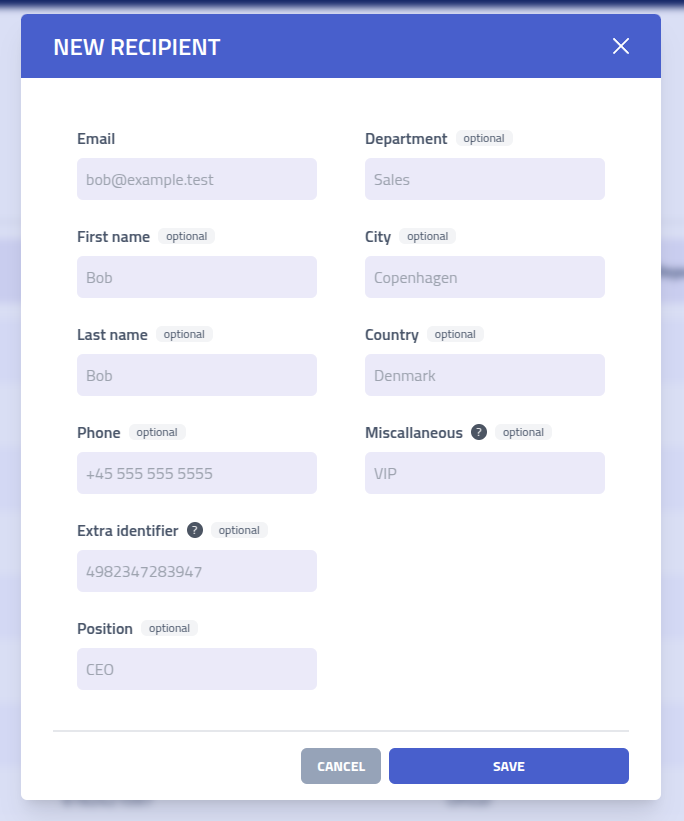
Each field serves can be used as a variable variable in emails and pages.
| Field | Description |
|---|---|
| Email Address | Unique email address |
| First Name | |
| Last Name | |
| Phone Number | |
| Extra Identifier | Additional unique identifier such as employee ID, username, or etc. |
| Position | |
| Department | |
| City | |
| Country | |
| Miscallaneous | Custom field |
Privacy Recommendation: Follow data minimization principles by adding only the information necessary for your specific campaign objectives. For most phishing, only the email is needed.
Import from CSV
Use the CSV import functionality to import multiple recipients at once.
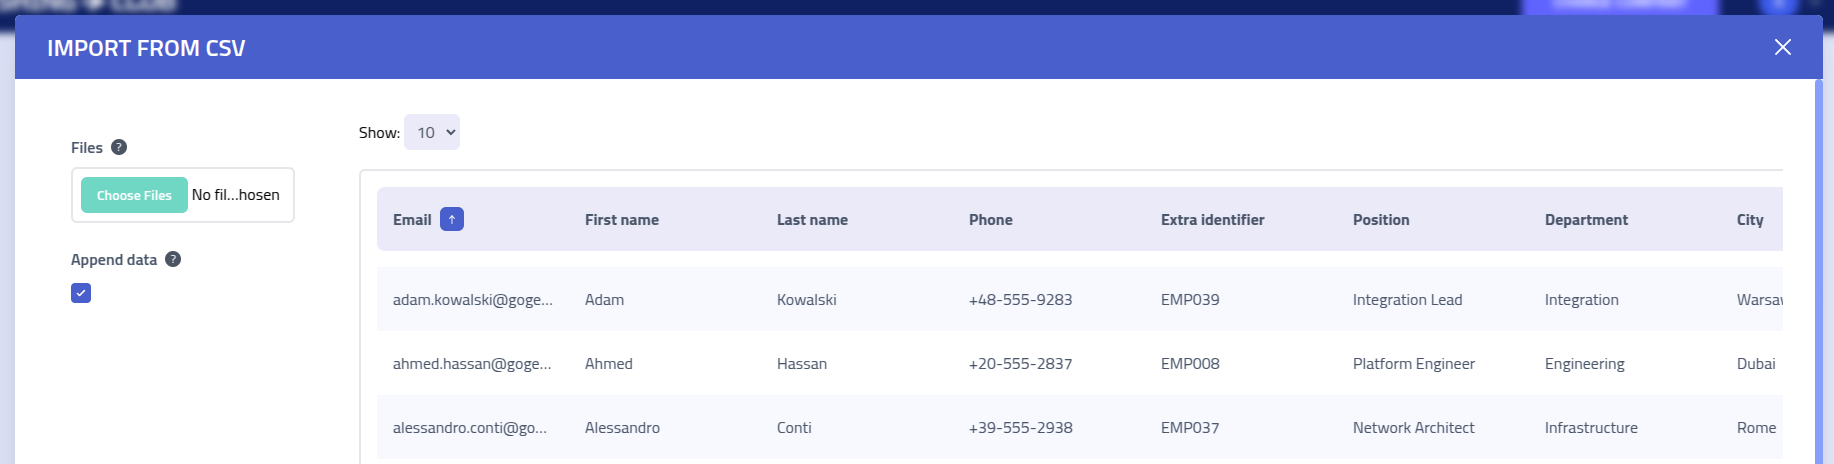
CSV File Format
Your CSV file must include a header row with column names matching the recipient profile fields. The system maps columns to recipient attributes based on these headers.
Here's an example of a properly formatted CSV file:
Email,Phone,ExtraIdentifier,FirstName,LastName,Position,Department,City,Country,Misc
"[email protected]","+1-555-0191","EMP001","Marcus","Jenkins","Solutions Architect","Engineering","Portland","USA","Kubernetes Expert"
"[email protected]","+7-916-555-0847","EMP002","Elena","Popov","Data Scientist","Analytics","Moscow","Russia","ML Specialist"
"[email protected]","+91-555-8273","EMP003","Raj","Patel","DevOps Engineer","Operations","Mumbai","India","Docker Certified"
"[email protected]","+47-555-9182","EMP004","Hannah","Berg","Product Owner","Product","Oslo","Norway","Agile Coach"
SCIM Provisioning
Besides creating recipients manually or importing them from CSV, recipients can be provisioned automatically through SCIM (System for Cross-domain Identity Management). SCIM lets a client company's identity provider, such as Microsoft Entra ID (Azure AD), sync that company's users into Phishing Club as recipients and keep them up to date. People the company creates, updates, or deactivates in their own directory are reflected in the matching Phishing Club company without manual import.
How it works
- A single global SCIM domain serves all SCIM traffic, configured under Settings → Access. SCIM is served from the phishing server, so the admin interface does not need to be exposed to the internet.
- Each company has its own SCIM endpoint and bearer token, so a given identity provider connection provisions into exactly one company.
- Provisioned users become recipients and provisioned groups become recipient groups.
- Deactivating or deleting a user in the company's identity provider removes the corresponding recipient from Phishing Club.
Step 1: Select the SCIM domain
Under Settings → Access → SCIM Provisioning, choose the global domain that will serve the SCIM endpoints. The domain must:
- be publicly reachable on port 443 with a valid TLS certificate, because Microsoft Entra connects over HTTPS,
- be a global domain, not one assigned to a specific company,
- not be an AiTM proxy domain.
We recommend a dedicated domain that is not used for active campaigns. A redirect-only domain works well: it redirects casual visitors away while still serving the SCIM API.
Step 2: Enable SCIM for a company
Open the company you want to provision into and choose SCIM. Enable provisioning and generate a bearer token. Copy the token immediately, as it is shown only once. The same screen displays the company's SCIM Base URL in the form:
https://your-scim-domain.tld/api/v1/scim/v2/<companyID>
You can rotate the token at any time from the same screen; the previous token stops working immediately.
Step 3: Configure provisioning in Microsoft Entra ID
This step is done in the client company's Microsoft Entra tenant (the directory whose users you are syncing), by someone who can manage applications there. Create a new application dedicated to provisioning: in the Entra admin center go to Enterprise applications, then New application, then Create your own application. Enter a name (for example "Phishing Club Provisioning"), select Integrate any other application you don't find in the gallery (Non-gallery), and click Create.
Open the application and choose Provisioning from the Manage
sidebar, then set Provisioning Mode to Automatic. Under
Admin Credentials:
- Set the authentication method to Bearer Authentication.
- Set Tenant URL to the SCIM Base URL from Step 2.
- Set Secret Token to the bearer token from Step 2.
- Click Test Connection to confirm Entra can reach and authenticate to the endpoint, then click Save at the top.
Step 4: Assign users and start provisioning
- Under Users and groups, assign the people who should be provisioned. If your Microsoft Entra plan supports group assignment you can assign groups; on lower plan levels Entra only allows assigning individual users.
- Back on the application's Provisioning overview page, click Start provisioning to begin syncing.
- Entra runs an initial cycle and then syncs incrementally, roughly every 20 to 40 minutes. You can optionally configure scoping filters, attribute mappings, and the accidental deletion threshold from the Provisioning page.
Attribute mapping
Phishing Club maps the standard SCIM user attributes to recipient fields:
userName→ recipient email (and the stored SCIM username)name.givenName→ First namename.familyName→ Last nameemails(primary or work) → EmailphoneNumbers(primary or work) → Phone- enterprise extension
department→ Department - core
title→ Position (Microsoft Entra maps the directory job title here by default; the enterprise extensiontitleis used as a fallback) addresses(work or primary) locality / country → City / CountryexternalId→ Extra identifier
Groups and campaign targeting
SCIM groups map one to one to recipient groups: when the company's identity provider provisions a group and its membership, Phishing Club creates the matching recipient group and keeps its members in sync. Phishing Club does not create a catch-all group for individually synced users; each user becomes a standalone recipient.
If your Microsoft Entra plan only allows assigning individual users, the synced people arrive as ungrouped recipients. Because campaigns target recipient groups, put them into a group to use them: create a dynamic group that automatically includes recipients whose attribute matches a value (you can filter on position, department, city, country, or misc), or add them to a static group manually.
Because the identity provider keeps the group in sync, membership can change between the time you create a campaign and the time it sends. To keep targeting current, when you schedule a campaign for a SCIM-enabled company Phishing Club pre-selects Late Schedule (visible under the scheduling step's advanced options, whenever the send start is more than 24 hours away). Late scheduling resolves the recipient group at send time rather than at creation, so people added or moved in your identity provider in the meantime are included. It is only a default — you can uncheck it to freeze the recipient list as it stands at creation.
Deprovisioning
Removing a user from a single group in your identity provider only changes group membership; the recipient stays, along with any other groups they belong to.
Deprovisioning a user (unassigning them from the application, disabling, or deleting them in Entra) marks the recipient as disabled rather than deleting them straight away. A disabled recipient is excluded from new campaigns and from active recipient counts, any pending sends in active campaigns are cancelled, and no further email is delivered to them. They remain visible in Phishing Club (shown greyed out and flagged Disabled) and their campaign history is kept, so nothing is lost if the change was temporary.
If the user is re-enabled in your identity provider before the retention window elapses, the recipient is reactivated automatically and can be targeted again.
Disabled recipients are permanently removed after a configurable retention window (set under Settings → Access → SCIM Provisioning). At that point their identity is deleted and cannot be recovered, while their historical campaign results are retained in anonymized form so aggregate statistics stay intact. You can also remove a company's disabled recipients immediately with the Prune removed users action in the company's SCIM settings.
Troubleshooting
- Test Connection returns 401: the bearer token is wrong or SCIM is disabled for the company. Regenerate the token and confirm provisioning is enabled.
- Test Connection returns 404 or cannot connect: the request is not reaching the configured SCIM domain. Confirm the Tenant URL host exactly matches the domain selected in Settings → Access, that it resolves publicly, and that it is reachable over HTTPS on port 443.
- Users are not appearing: confirm they are assigned under Users and groups and that Provisioning Status is On, then check the Entra provisioning logs.
Recipient details
Each recipient has a page that provides analytics, which groups the recipient has been added to, and an overview of which events they created.

The score cards in the top display the recipients analytics across all campaigns:
| Field | Description |
|---|---|
| Total Campaigns | Number of phishing simulations this recipient has participated in |
| Emails Opened | Unique email opens tracked via embedded tracking pixels |
| Initial Link Clicks | First-time clicks on phishing links per campaign |
| Data Submissions | Number of campaigns where recipient submitted personal information through phishing forms |
| Reported | Number of campaigns the recipient has reported |
| Repeat Offenses (Links) | Pattern of clicking phishing links across multiple campaigns |
| Repeat Offenses (Data) | Pattern of submitting sensitive information across multiple campaigns |
Export
Use the Export Events button to download a export for the recipients data.
The export includes recipient.csv with the recipients personal data and a
events.csv includes all events associated with the recipient.